AWESOME!!! Let the Resin Fun continue!
Showing posts with label molds. Show all posts
Showing posts with label molds. Show all posts
Friday, April 21, 2023
Sunday, December 11, 2022
"Jewels of the Sea" Mixed Media Altered Nut Can
"Jewels of the Sea" Mixed Media Altered Nut Can
I started with a Nut Can covered with Brown Craft Paper that I created a cardboard lid for with a molded Resin knob.


Then I added a bit of the Graphite Paste from Finnabair through a TCW Stencil.

I then went for a few resin pieces and a few Pearls from Frank Garcia Memory Hardware.


I painted the whole with Black Gesso followed by The Metallic line of Acrylic Paint also from Prima.


and here are the results...

What will you upcycle? What Treasure will you create?
Well that's it for this time...till next time...
As always you can find my work on my blog LynzCraftz , on YouTube LynzCraftz , as well as FaceBook LynzCraftz .
Tuesday, January 26, 2021
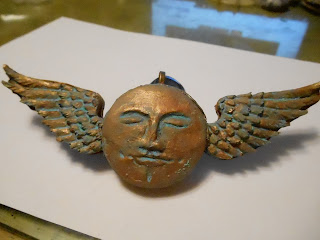
"Angelic Peace" Amazing Casing Resin

After a long absence I'm back, back to Artistic impressions, back to life!
This time I've got something meaningful to myself as well as others, the action of Prayer as well as the thought that we are watched over by Angels. So what better for this Easter than a Pure White Angel.


Then I proceeded to make a mold using Amazing Mold Putty. After cutting the mold open to remove the original I strapped it back together with a couple of rubber bands.

I used Amazing Casting Resin to pour into the mold and after on 20 minutes or so removed the rubber bands and de-molded it. Then I found some flourishes from my stash that made perfect wings and presto!

In the still of the night the Angel of Angelic Peace still watches over you.
What will you decide to make this Easter?
Well that's all for this time. Till Next Time...
As always you can find my work on my blog LynzCraftz , on YouTube LynzCraftz , as well as FaceBook LynzCraftz .
Monday, October 29, 2018
Happy Halloween Altered Cardboard Coffin

After a couple of health scares and some time off I'm finally back! So I needed a little Halloween fun...lol...an Altered Cardboard Coffin from the Dollar Store, some IOD Molds, Prima Waxes and Lindy's Stamp Gang Sprays.

The first thing before I forget...Lightly sand the glossy surface of the coffin. It's so glossy even the gesso has trouble holding on if you don't give it a light sand. I started with some scraps of mail from the trash that I DecouPaged(I use the Matte) down. Only on the back to try and minimize the amount on the surface. The with a Tim Holtz Brick Stencil and some TCW Molding Paste I added some texture here and there.


I then came up with something I liked using the Resin pieces I cast from the IOD Molds and glued them down using #D Matte Gel. Then I when around the edges of the resin with Graphite Paste also by Prima.

and then...more gesso...

To finish...a couple squirts of the Lindy's Stamp Gang Sprays in Witch's Potion Purple and Screamin' Banshee Black. Then just touch the edges with some of the Prima Finnabair Waxes in the Old Silver, Amethyst Magic and Mystic Turquoise. It's finished!
A Gothic Style Altered Cardboard Coffin to decorate your table and store candy or other goodies in.
That's about it for this post...a little more on my health later.
As always you can find my work on my blog LynzCraftz , on YouTube LynzCraftz , as well as FaceBook LynzCraftz .
Well that's the end for now...Till Next Time!
Wednesday, August 29, 2018
Holiday Birdhouse Pendants

Using Amazing Casting Resin, Alumilite Dye(Red), some Acrylic Paint, Snow Tex(available at most craft stores) and some beads and a Christmas Tree Charm I created these tiny Birdhouse Charms just in time for the Holidays.

What gifts will you create this season with Amazing Casting Products?
Will that's about it for this post...Till Next Time!
As always you can find my work on my blog LynzCraftz , on YouTube LynzCraftz , as well as FaceBook LynzCraftz .
"Whale Song" Resin Pour Wall Art


I first started with a polymer clay whale that I sculpted from Super Sculpey(baked according to package directions) I left it flat on the back so I could glue it down to my mold form & then I used Amazing Mold Rubber to create the mold. It's a 1-2-1 ratio so it's easy to mix & use. After the Amazing Mold Rubber cured & I removed the original it was time to pour some clear blue resin whales using Amazing Clear Cast & Alumilite Dye I mixed up & let them cure. Aren't they cute?


The final step was to mix just a touch(the tip of my pallet knife) of the Alumilite Metalic Powder in Pearl to another batch of Amazing Clear Cast Resin & pour over the entire piece whales & all.

What end of Summer projects do you have planned?
As always you can find my work on my blog LynzCraftz , on YouTube LynzCraftz , as well as FaceBook LynzCraftz .
Well that's the end for now...Till Next Time!
Thursday, May 10, 2018
#The100DayProject Creative Fun!
Ok so I know it's been a while since you've seen a post from me but I have been busy at least...lol. I've been involved with an Instagram event called #The100DayProject designed to help spark the creative process. Now this is something that most of you know I don't have trouble with but I thought it would be good to challenge myself to create something everyday and therefor hold myself accountable to that end. What a fun exercise it has been too! It began an April 3rd and will run until sometime in June I think...lol...I'm terrible with dates. So here's what I've got so far...sorry, it'll be a long post...
 This piece was done using the Art Alchemy Patina Effects Paste Set and some of the Art Alchemy Wax.
 This piece was done using the Art Alchemy Rust Effects Paste.
 This piece was a rework of an earlier piece.
 This was also a rework of an earlier piece.

 This piece was also done with Swellegant also using my Faux Abalone stone.
 This piece was done using Premo Gold clay which was painted after baking with Dazzling Metallics by DecoArt. The inner layer was done using SculpeyIII which is traditionally too brittle for this kind of work but works well when adhered to the Premo outter layer.
 Oh...these may be out of order...lol...this is the Faux Abalone from the previous piece.
 This one was done with the Art Alchemy Patina Effects Paste set using the entire set on resin.
 This one was a resin face, colored on the back with Alcohol Markers. I used a little Metallic Lustre on the piece and the stone is my Faux Jade.
 This was one of my original pencil drawings transferred to polymer clay, then layer with resin and acrylic paint.
 This one was done the same way.
 This one was done using the same method, I was trying to film a video of this technique and my camera was causing me problems that's why there are so many...lol.
 This one was done using the same technique but instead of acrylic paint between the resin layers I used water release tattoos from the Dollar store.
 This was done with the same technique.
 So was this one...but at last, this is the one from the tutorial!
 This was a faux stone created using the Sculpey Cab Mold.
 This is a chipboard Crown Mixed Media piece I created using Vivid Ultra Metallics by Colorarte.
 This one was done using the colored pencil transfer technique.
 This was created using my Faux Raku technique.
 This is a Stamp Embossed bracelet.
 This is my Faux Ivory Technique.
 This one is from my Faux Bone technique.
 This is an Altered Box Mixed Media piece using Art Alchemy Patina and Rust Effects Paste sets.
 This is my Faux Skeletonized Coral technique.
 This one is from my Faux Opalized Wood technique.
 The are faux Black Opal using polymer clay.
 This one is the Art Alchemy Rust Effects Paste Military Set.
 This one was done using the Art Alchemy Wax.
 This one was done using the Art Alchemy Rust Effects Paste Metal set.
 This one was done with the Art Alchemy Patina Effects Paste Set.
 These wings were done using Angelina Film, a hot Iron and some Iridescent glitter.
 This one was done using the Art Alchemy Rust Effects Paste Camouflage Set. As you can see I love these...lol.
 Last...at least for this post...this one was done using the Art Alchemy Wax and a large resin Rhinestone which surprisingly did great in the oven with the polymer clay.
Well that's it for this time and hopefully it wont be so long until my next post...Till Next Time!


Thia piece was done with Swellegant.


 |
| As was this one. |


Well that's it for this time and hopefully it wont be so long until my next post...Till Next Time!
As always you can find my work on my blog LynzCraftz , on YouTube LynzCraftz , as well as FaceBook LynzCraftz .
Subscribe to:
Posts (Atom)