Saturday, September 7, 2013

"Vintage Beauty" mini album

I apologize for not posting last week, been real busy around here. I made the mistake of deciding to use the closet in my studio...lol...wow, floor to ceiling full of 24 yr old guy stuff! My Son's remaining leftovers that he says he doesn't have room for in his apartment. Well I don't either...lol, so out in the storage shed it goes. Now it will probably take me another week to organize it for my own use, I may need a draftsman...lol.
Well now I did finish up a mini album I've had in the works ( I did the cover last August...lol) but better late than never I say....
"Vintage Beauty" mini album
http://sweetlyscrappedart.blogspot.com
 http://thegraphicsfairy.com
 http://magicmoonlightfreeimages.blogs...
 http://freevintagedigistamps.blogspot...

These are the links to these beautiful vintage images, I must say they are stunning & inspired the theme & title of this mini album. I used hot glue for the texture & design on the cover. Painted it with acrylic paints of various colors & antiqued with a pickling gel then sealed it with a gloss sealer. Some bling & a little LSG spray on the flowers help to complete the cover. I've up-loaded a YT video & I'll try to share the link.
 "Vintage Beauty" mini album YT Video
 As always thank you so much for stopping by...Till Next Time!

Tuesday, August 27, 2013

My very first ever...layout!

Wow...I did it! I didn't think it would be my cup of tea but I really did have a blast creating my first ever layout! Created for the Lindy's Stamp Gang August Color Challenge...


This layout is very special to me since the photo is my Husband & I the week before our Wedding way back in 1984. Because of a sever flood in 1990 we have very few photos of our first 10 years together so this one has very special meaning to me as does the 1 Wedding photo that I have. So just looking at this layout makes me smile!

Lindy's Stamp Gang August Color Challenge...my first layout!


I used quite a few techniques on this layout from gesso texture clouds to the hot glue tree branches & even the texture gel waves, I had so much fun! First I mixed the Texture gel with Bahama Blue American paint & Golden Sleigh Bells Magicals into a gorgeous shimmery ocean wave color & spread it with my pallet knife to create the waves. Then I used gesso to create the background texture including the clouds which I pounced on with a stiff brush & the drug out the back edge for a wispy look, I heat set the clouds to get them to bubble a bit for added texture.I then painted the background with American paints in Spiced Pumpkin, Cherry Red & Plum(closest colors I had to the challenge colors). I then added some black paint to a bit more of the texture gel with some Cocoa Bean Copper Magicals & created the leaves & trunk of the tree. I added a bit of texture to the trunk with a metal knitting needle & to the leaves with a stiff brush. After this dried I used my hot glue gun to add the branches to the tree & a few more leaves & sprayed the entire tree top with Cocoa Bean Copper Starburst Spray. I brought out some of the details in the background & the waves with gesso & did a soft edging on the entire layout also with gesso. The dyed cheesecloth is from my stash & is dyed with fabric dye. The fishing net is also from my stash. The sparkly embellishments are K&Co & some of the flowers are Petaloo. The large butterfly is also from my stash. The entire layout has a finished spray of Glitz Sprtiz Cactus Gold & the waves have a final spray of the Tibetan Poppy Teal . I hope I've covered everything, I had such fun & I learned so much creating this layout...it won't be my last.
Thank you all so much for stopping by...Till Next Time!

Monday, August 26, 2013

"Hearts" Altered Trinket Box

This is a small altered trinket box that I recently finished up for a swap with a dear friend on YT. I try to match a piece of jewelry with each altered trinket box & this time it was a faux turquoise set, a pendant & earrings. I really love this whole set...
Trinket Box Before

Trinket Box During
"Hearts" Altered Trinket Box
"Hearts" Altered Trinket Box -top
"Hearts" Altered Trinket Box -side

"Hearts" Altered Trinket Box -top close-up
Lots of my handmade flowers, some K&Co embellishments, Want2 scrap bling, some of my polymer clay pieces & lots & lots of Lindy's Stamp Gang sprays went into this little trinket box. A little Stardust Stickles really sets off the flowers nicely. Next...the jewelry...
Faux Turquoise Pendant & Earring Set

Faux Turquoise Pendant & Earring Set -with the flash
The pictures don't do justice to just how pretty these are & for some reason I can't share the YT video here anymore...I must have changed a setting or something...lol.
Thank you so much for stopping by today...Till Next Time!

Wednesday, August 21, 2013

Finishing up the ATC's

Ok so I might have gotten a bit carried away...I only meant to make 8 more...lol! A little more hot glue art, some more Lindy's Stamp Gang sprays( I'm almost completely out!), various paints & embossing powders...add a few embellishments & you've got it! ATC's are just that...Artist's Trading Cards...meant to be traded & shared little snippets of your work, style or just playful doodling! I just love the idea of trading tiny little bits of each others work, what a fun way to collect Art! So here's just a few more ATC's I created this week...
ATC's (Artist's Trading Cards)
 Lots of fun techniques here...hot glue art, stamping in hot glue, embossing, resists, painting & more...your imagination is the only limit...well, that & maybe the size...lol...2 1/2" x 3 1/2" may seem small but it's amazing how my fun can fit on such a tiny blank card. Well again I'm off to get my mojo charged with another project so thank you so much for stopping by! Till Next Time...!

Saturday, August 17, 2013

Playing around with ATC's

Well...I needed to recharge my mojo just a bit so I decided to just play with some mediums & some tiny bits of 2 1/2 x 3 1/2 inch bits of cardstock...various paints, inks, embossing powders & of course my favorite Lindy's stamp gang sprays!

Lindy's sprays & ACT's
I had so much fun working on these that I'm making a few more...hehehe...they're always good to have on hand to send out to friends & other crafters as a little show of your work. Who would love to have a little sample of all your friend work...I think there should be more ATC trading going on...lol!
Well so long for tonight & thanks for stopping by...Till Next Time!

Tuesday, August 13, 2013

By the light of the Moon!

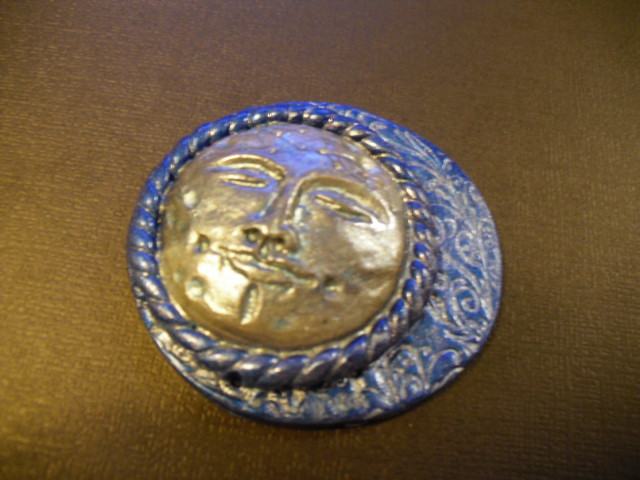
So I've been playing around with one of my original molds as I do from time to time & I thought I would  share just a few of the results...first is the original piece that I sculpted & the clay mold...
My original "Man in the Moon" sculpture & clay mold created from it.

I just use Sculpey original for most of my molds because I like a rigid mold. One of the perks is less distortion. I basically dust the mold with some pearl-ex powder, fill the mold with a ball of clay & try to use just the right size to barely overfill the mold. Then I turn it over onto my baking tile(small mirrored tile) & using slight pressure flatten it so that the back sticks to the glass & the extra is squeezed out around the edges. Lifting straight up on the mold so as not to distort the piece I then trim off the extra that was squeezed out. This leaves you with an exact copy of the original that you can now alter to your hearts desire! So second is a piece using different colors of clay & pearl-ex powders & a little bit of added detail before baking...
Then after baking a bit of sealer & some Lindy's Stamp Gang sprays in various colors & you have a totally different look!


Then to even take it a step further I created a background bezel to change it up even more...
"Man in the Moon" into "Face of the Sun"!
"Man in the Moon" Into "By the Light of the Moon"
These are just a few of the different looks you can achieve with a single mold! A different colored clay, different types & colors of finishes & a few added details & the results can be quite stunning! These will be used for components in charms or pendants & can have added dangles at the bottom also...so many possibilities & so much variety of materials available to altered the finished look that I could keep playing for days & never duplicate a piece. Oh now imagine adding some embossing powders to the surface...Oh you know I'm gonna try it!
Well that's all for tonight, thank you so much for stopping by...Till Next Time!

Thursday, August 8, 2013

Up,Up & Away Polymer Clay!

Well kinda...lol...Hot Air Balloons anyway! I may have gotten just a bit carried away but I just love they way these turned out & have had a great response from all my friends here at home...everyone wants one! The balloon bead is made from polymer clay, some painted some colored clays all strung with glass & metallic beads over various sorts...
Polymer clay Hot Air Balloons

More Polymer clay Hot Air Balloons
I actually made these last week but it took quite a few attempts to get even a decent pic. of them...I need to learns better photography skills. Gonna do some more practice on that this weekend.
Thanks so much for stopping by...Till Next Time!