
Thursday, December 19, 2013
Rolled Inclusion Bead Variation Tutorial & share
Here's a quick tutorial on a variation to the rolled inclusion beads video I did earlier this year. Some added acrylic paint adds a gorgeous touch & a different looks to these pieces. I've used transparent Polymer Clay, black clay, Peridot Metallic Acrylic Paint & Christmas Green Metallic Acrylic Paint & several different glitters...
 I really love the way these turned out & I'll definitely be creating more of them to share with you. Thank you so much for stopping by...Till Next Time!
Wednesday, December 11, 2013
LSG December Color Challenge
Well the Holidays are too quickly approaching & I'm not even close to ready but I did finish a lovely Christmas card for the LSG December color challenge. This month colors were non-traditional & were quite the challenge! With such a gorgeous rich color scheme & inspirational image I just couldn't resist...


 I've used several different Starburst sprays to create the background...Tibetan Poppy Teal, Tainted Love Teal, Autumn Maple Crimson, Witch's Potion Purple & just a spritz of Screamin Banshee Black. I just love the way they all came together & although I've never been to Paris, I'd like to think this looks like a calm, foggy night in Paris...so serene. Just a bit of added bling & some vintage German Silver Tinsel to finish it off. Very non-traditional & quite lovely I think.
Well that's it for now, Thanks so much for stopping by...Till Next Time!


Well that's it for now, Thanks so much for stopping by...Till Next Time!
Christmas Card ATC's
Sorry it's been a few days since I've posted, I've been a bit under the weather. Then with the ice storm & all, you know...Well I wanted to play around with some ATC's & decided to do an ATC Christmas Card. With some gorgeous vintage images from Sweetly Scrapped & a few others I just had some fun with them! I've used some LSG sprays on the backgrounds, some Ranger Embossing Tinsels & some Glossy & Crackle Accents on them for some sparkly touches. They're sweet, simple & very festive!


 Well, I know it was short & sweet but I have more to come! Thanks so much for stopping by...Till Next Time!


Tuesday, November 26, 2013
The Painted Rose mini album
This is the mini I created to go with "The Saloon Girl" altered cigar box. I've used a ColorBok paper line called Neutral & just a touch of the ColorBok Rosewood paper for some pops of rich red. I've also used some Ranger Embossing powders & lots of LSG sprays. I've titled this mini "The Painted Rose" as a tribute to these pioneering ladies of the evening.
 Here the 2 pieces are together, the altered cigar box & mini album...I wanted to capture some of the beautiful Fall colors in these pieces so I used LSG sprays in the following colors...
Red Hot PokerOrange
Ponderosa Pines Olive
Screamin' Banshee Black
Silhouette Silver
Van Dyke Sepia
The roses are all colored with the LSG sprays & are my own handmade flowers. I've had this project in mine for quite a while & I really like the way both pieces came out & how well they go together. Quite a few of my polymer clay pieces have been used on both projects as well & I really enjoyed altering all the different components & embellishments that went into each piece. A classic example that vintage can be elegant & feminine & even a little colorful!


 The texture on the cover was created with craft paper(brown paper bag) & I have an older tutorial on YT Faux Leather on Chipboard where I created these actual covers. I then added the wide lace panel across the lower half of the front & back with a heavy gel medium then painted & sprayed it all to match. I think it looks a bit like tooled leather. This mini was so much fun to create & I'm so loving these Fall colors right now. Check out the YT video & take a peek inside. I've used a few images from the graphics fairy, moonlight magic free images & sweetly scrapped...all 3 have just gorgeous vintage images.
Well that's all for today but be sure to stay tuned for more. Thanks for stopping by, Till Next Time!
Lindy's Stamp Gang November Color Challenge...


Red Hot PokerOrange
Ponderosa Pines Olive
Screamin' Banshee Black
Silhouette Silver
Van Dyke Sepia
The roses are all colored with the LSG sprays & are my own handmade flowers. I've had this project in mine for quite a while & I really like the way both pieces came out & how well they go together. Quite a few of my polymer clay pieces have been used on both projects as well & I really enjoyed altering all the different components & embellishments that went into each piece. A classic example that vintage can be elegant & feminine & even a little colorful!


Well that's all for today but be sure to stay tuned for more. Thanks for stopping by, Till Next Time!
Lindy's Stamp Gang November Color Challenge...
Tuesday, November 12, 2013
Hubby's Photography
Ok so who knew...I've only been married to the guy for almost 30 years...but...Hubby been trying his hand at photography! So I thought I just had to share these gorgeous photos...


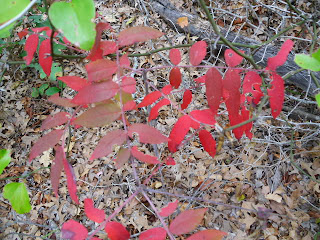


I know...right!!! Awesome! I was so impressed, especially since he'd never even used my camera before. Not to mention I had no idea there were that many different varieties of mushrooms in our woods. I know now I'll be sharing these more often cause he'll be hooked...lol. Thanks for stopping by & feel free to leave him a little feedback...he'll get a kick outta that...lol. Thanks for stopping by...Till Next Time!


I know...right!!! Awesome! I was so impressed, especially since he'd never even used my camera before. Not to mention I had no idea there were that many different varieties of mushrooms in our woods. I know now I'll be sharing these more often cause he'll be hooked...lol. Thanks for stopping by & feel free to leave him a little feedback...he'll get a kick outta that...lol. Thanks for stopping by...Till Next Time!
Monday, November 11, 2013
The Saloon Girl altered cigar box
Wow, it's been a while since I posted...I've been super busy setting up my etsy shop. It's now open as of today...yeah!!! It took a lot of work to get this far & there's still plenty to do but for now I can take a breather & share my latest project. An altered cigar box which I've titled "The Saloon Girl"...
 I took some gorgeous wide lace & using gel medium I glued it to the cigar box top & the hinge. The box was damaged & took quite a bit of repair to be usable so the lace provided extra structure & support for the hinge.I then painted & antiqued the lid using acrylic paint & then LSG sprays.
 Some fabric leaves in various colors along with a bit of lace & my handmade flowers cluster around the cuff of my old driving glove(my dog chomped the other one).
 I created the faux lock with polymer clay that's been painted & patinaed to match the box. Some painted poker chips & a few playing cards that I found on pinterest finish off the box nicely. I just love the way this one turned out with the shimmer from the LSG to the tooled leather look of the lace, a super fun piece!
Well I hope everyone had a great weekend & thanks for stopping by...Till Next Time!
 |
| "The Saloon Girl" altered cigar box |


Well I hope everyone had a great weekend & thanks for stopping by...Till Next Time!
Monday, October 28, 2013
The Olde Curiosity Shoppe mini album


I've created another mini this time using the last of my G45 Olde Curiosity Shoppe paper collection. I absolutely love this paper, it's so vintage & eclectic. I used almost exclusively just the papers, sticker & chipboard sheets to create this 6''x6'' mini album. The chipboard covers are created using brown paper sack faux leather, these are the ones I made in the tutorial. I've used an accordion binding & pocket pages of black cardstock. Each page is embellished with paper, fussy cuts from the collection, chipboard pieces & some sticker embellishments as well. Lots of Glossy Accents & Crackle Accents to bring out the detail of some key elements on the pages & embellishment. Each pockets page has a large photo mat & the pages have plenty of room to tuck photos, trinkets & little keepsakes as well as lots of room to journal. A few of my handmade flowers, one of my art tiles & chunky charm help to embellish the cover of this unique mini album. I had a blast creating this one!
Thanks so much for stopping by...Till Next Time!
Monday, October 21, 2013
"Fleeting Memories" mini album
Here's a mini album I finished a week ago but I wanted to finish the other one I started as well so there will probably be 2 back to back mini album posts...I hope you don't mind...lol. Although not necessarily a Fall theme I though the colors were at least fitting. I used Hot Off the Press "Noted" paper collection with a vintage butterfly theme. I also used some collage images from Sweetly Scrapped in this mini...lots of gorgeous free images here to enjoy. I've made lots of room for photos, keepsakes & memorabilia in this tiny little album...it measures only 4 1/2 x 5 inches....


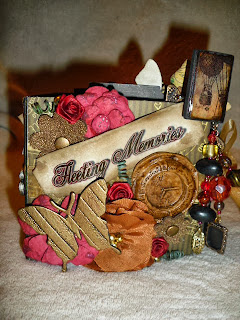 A couple of Spare Parts paper flowers & Making Memories leather flowers that I embossed with Tarnished Gold Ranger embossing powder & a luscious raw silk handmade flower in a rust color finish off the cover beautifully. I really enjoyed creating this mini album & have uploaded a YT video "Fleeting Memories" of the completed mini...but for some reason I can no longer share my videos to my blog directly.
Well...I'll be back with another mini album shortly so Thanks for stopping by today...Till Next Time!
 |
| "Fleeting Memories" |
 |
| "Fleeting Memories" Mini Album |


Well...I'll be back with another mini album shortly so Thanks for stopping by today...Till Next Time!
Tuesday, October 15, 2013
Lindy's Stamp Gang October Color Challenge
Wow, feels like I haven't posted in weeks...Ok so I haven't...lol. Been so busy trying to get project done. So here is my entry for the Lindy's Stamp Gang October Color Challenge & here's the Inspirational image & color sample...


I created a couple of Halloween tags using lots of Lindy's products & a few embellishments.


1st I stamped & embossed the backgrounds using Ranger Clear on the skulls & Jack O Lantern Orange on the pumpkins. Then I sprayed the backgrounds with Witch's Potion Purple over the skulls & Screamin Banshe Black over the pumpkins. Then I did some splattering over the skulls. The large pumpkin is also embossed with the Jack O Lantern Orange embossing powder. The pumpkin leaves have been sprayed with the Freaky Frankin Lime & then I added some Stickles & a little Crackle Accents around the edges. The vine swirl was created using my glue gun, then I rubbed a little gold acrylic paint over it. I sprayed some cheesecloth with just a quick spray of the Sceamin Banshe Black to create the spider webs & the little spiders are embossed with Midnight Pewter Obsidian . The Boo sentiment was hand written with my embossing pen & embossed in the same powder & then sprayed with the Hag Warts Orange. The pumpkin background tag uses these same products except that the cheesecloth is this time sprayed with the Red Hot Poker Orange. I distress the edges of both tags with Walnut Stain distress ink by Ranger. I'm very sorry I don't know who to credit for the stamped image...I do believe it is a Sweet Pea Stamp...I won it a few years back in a grab bag of stamps. I looked & looked but could not find the source, if anyone knows who the artist is please let me know so I can give full credit for this gorgeous image. The glitter embellishments are from K&Co & the 2 large flowers are my handmade flowers. Wow...these were so much fun to create & although they look simple, I used many different techniques to create them.
Head on over to the Lindy's Stamp Gang blog & check out the color challenge details, there's still plenty of time to enter.
Thank you so much for stopping by...Till Next Time!
Friday, October 4, 2013
"Fall Patina" Altered Box/Jewelry Box & Necklace
Can you believe this started life as a cell phone box? I love the gorgeous teals with the gold & copper colors, my new faves for Fall!
I've done some stenciling with LSG Magicals & texture gel, made some polymer clay embellishments, did some embossing & spraying(also with LSG) & added a few of my handmade flowers to finish off the top. Even the feet are polymer clay acorn halves...
 |
| "Fall Patina" altered box close up of flower cluster |
 |
| "Fall Patina" altered box close up of polymer clay escutcheon plate |
 |
| "Fall Patina" altered box close up of Polymer clay acorns & leaf texture |
 |
| "Fall Patina" Necklace |
 |
| "Fall Patina" Altered Box |
This was such a fun box to create & alter! I love the LSG colors, all the texture & the embellishments I created. All of it comes together & it looks like a splendid Fall in the making! Thank you all so much for stopping by...Till Next Time!
Friday, September 20, 2013
Art Journal Entry for today
How about a little Art Journaling? Well, I've got so many projects going on right now that I decided to play in my art journal for a bit. I actually started this page over a year ago & decided to finish it instead of starting a new one. I had the background & the shape of the face & hair started so it really went pretty quick. I just used some leftovers from previous projects, painted her face & added some stamping, flying spirals & some dots to finish it off! It really felt good to just relax & create with no finished concept in mind..."Imagination takes flight" awesome inspiration!...


Thursday, September 12, 2013
"Log Book of the Tranquility" mini album
A while back ago...back in April 2012, I altered a wine bottle with a underwater theme. I knew then that not only would I keep it for myself but I would create a series of projects to show case in my studio using this same theme. This piece is the fourth project in the series...
Using K&Co. Tim Coffee's Travel collection I created this 5 page, mulit-pocket/flap mini album with room for loads of photos & journaling. Although the cover has a few of my own handmade embellishments the inside is created with just the pattern papers & the card stock embellishments that come along with the collection. The covers have a texture & design created with thick gesso & painted first with black acrylic paint then with LSG sprays. The art tile is created with a piece of the paper & some glossy accents & edged with black paint. The Tiki face & the charms are polymer clay pieces with some little sea glass beads. I love the way these four projects go together & I will add the YT links to each one here...
"Mermaid Tears" altered wine bottle...
"The Lost Tranquility" mixed media shrine...
"Treasures from the Tidepool"...
"Log Book of the Tranquility"...
The altered wine bottle was among my very first videos so it's only a slideshow but it still shows all the detail I think. These are among some of my all time favorite projects & I can't wait till I have a shelf to display them on. I've enlisted Hubby's help on that so we'll see...lol.
Well, Thanks so much again for stopping by...Till Next Time!
 | |
| "Log Book of the Tranquility" mini album |
"Mermaid Tears" altered wine bottle...
"The Lost Tranquility" mixed media shrine...
"Treasures from the Tidepool"...
"Log Book of the Tranquility"...
The altered wine bottle was among my very first videos so it's only a slideshow but it still shows all the detail I think. These are among some of my all time favorite projects & I can't wait till I have a shelf to display them on. I've enlisted Hubby's help on that so we'll see...lol.
Well, Thanks so much again for stopping by...Till Next Time!
Tuesday, September 10, 2013
Polymer clay play time
Just a quick post since I forgot these week before last...ooops! A couple of pairs of earrings, one set from the skull beads tutorial that I posted earlier on YT & the other was just playing around making some faux coffee beans...
Well I said it would be quick...lol. A friend of mine had asked if I could make her some earrings after she'd see the skulls so I made an extra pair for her & she loved them...thanks Rach!
OK gotta go, I'm working on my next mini album & I almost finished...well, still have the cover to finish but other than that I'm almost done...lol. Thanks again for stopping by...Till Next Time!
 |
| Polymer clay skull bead earrings |
 |
| polymer clay coffee bean earrings |
OK gotta go, I'm working on my next mini album & I almost finished...well, still have the cover to finish but other than that I'm almost done...lol. Thanks again for stopping by...Till Next Time!
Subscribe to:
Posts (Atom)