Sunday, July 28, 2013

"ByGone Day's"

It's no secret that I have a love of faux finishes/painting & metallic textures/finishes. My latest piece is just that & polymer clay all the way...
"ByGone Day's" with the flash just to show the depth of color on the center stone


"ByGone Day's"
Just look at the mottling on the faux copper from the Lindy's Stamp Gang sprays...I really like the effect it gives! I think this piece is destine for the "Color Your Dreams" steampunk trinket box...! What a gorgeous match!
Thanks so much for stopping by...Till Next Time!

Thursday, July 25, 2013

Did I say "I love texture"

Well...yes I do love texture! All sorts of texture...wood, metal, glass...rough, smooth, silky & soft...I love texture! Just a quick post today & just one pendant..."The Beauty of Age" as I'm feeling a bit of mine today...age, that is...more on that later. This piece is one that I used a rusting medium on. I actually got the product at a yard sale & it was almost solidified when I used it so I was shocked that it even worked. I really need to get some more & do some experimenting cause I love how this piece turned out. One of my "pearlstones" in the center surrounded by some etched gears all in polymer clay with some tiny clay screw heads to finish it off. The rust is just amazing & the texture is so rough & grungy...I really like it!


"The Beauty of Age"
That's it for now so thanks for stopping by...Till Next Time!

Tuesday, July 23, 2013

"Angel Whispers"

"Angel Whispers" altered cigar box/book box...a damaged vintage cigar box that I altered into a book box. I took a vintage cigar box that was heavily damaged & turned into a book box by adding some chipboard covers, a spine & some embellishments. I love the color combo & the shimmer from the Golden Sleigh Bells by Lindy's Stamp Gang. It really gave a vintage look to this piece...

Before
"Angel Whispers" altered cigar box
The small blue flowers were white & have been sprayed with the Frosted Forget-Me-Nots also from Lindy's Stamp Gang & they match the paper almost perfectly. I apologize for not knowing what the paper collection is, it was a gift. The large flower is a chenille fringe trim flower that I made to give a softer look to the piece. The little cherub is one of my polymer clay pieces made from a broken terra cotta cherub that I had kept for years. I have a video up on YT about this piece as well as one on the broken cherub.
Well...thanks so much for stopping by...Till Next Time!

Monday, July 22, 2013

Faux Lava Stones tutorial


http://www.youtube.com/watch?v=q3ESvxBXddg&feature=c4-overview&list=UUcCXHSCqnDifufXItxRimSw

Here's a quick tutorial on how to add a faux lava or coral bezel around a cabochon or bead for some great looking pendants or charms.
Finished pendants/charms

Cabochons into faux lava stones

Finished faux lava stones
Well I know it was a short post today but I may have more to come, so stay tuned! Thanks for stopping by...Till Next Time!

Wednesday, July 17, 2013

"Color Your Dreams" Altered Tin


This is another altered tin done using a Christmas cookie tin. Done in an altered steampunk style, I used the hot glue gun again for the main texture...rivets & welded metal. Again I've used the Lindy's Stamp Gang sprays to give the copper paint a grungy aged look. I've also used them throughout the piece...on the gears, the flowers, the paper & as an over all spritz just to tie it all together. I've used a few of my polymer clay pieces & some embellishments from my stash, some copper chain & even some recycled pieces the my Husband brought in. Lot's of fun textures in the piece & I altered a dial from a compressor of some sort in to an "earth clock" ( just a fun, made up piece). Lastly I used Crackle Accents on the title of the piece...


"Color Your Dreams" altered tin


"Color Your Dreams" with flash

"Color Your Dreams" with flash to show detail
A few of the photos are with the flash just to show some of the details a bit better. I just love the way this piece turned out. The rich warm metallic colors are some of my favorites.
Thank you so much for stopping by today...Till Next Time!

Monday, July 15, 2013

My entry for the Lindy's Stamp Gang July Color Challenge

Color Challenge July 2013 lindys stamp gang glimmer shimmer
July Color Challenge


I'm so excite to share my entry in to the Lindy's Stamp Gang July Color Challenge! This was a super fun project & quite a challenge as well. I wanted to use not only all of the colors but the image as well for my inspiration. So I went with a strawberry theme...
"In the Strawberry Patch"
"In the Strawberry Patch" inside
"In the Strawberry Patch" contents

"In the Strawberry Patch" with Strawberry Blossom pendant & Bracelet
Close up of pendant, beads & bracelet

Close up of Pendant & bracelet

"In the Strawberry Patch" close up
I've used Silent-Night-Silver, Frosted-ForgetMeNots , Golden-LumpO'Coal & Scintillating-Silver I'm really enjoying using the Lindy's Stamp Gang product on some of my altered art pieces & even on some of my polymer clay pieces. The blossom & the leaves of the pendant & the charm on the bracelet also have these same LSG sprays colors on them.

I would also like to enter this project in the Lindy's Stamp Gang Design Team call. Not only do I love these products but it would be an honor to bring some of my unique crafting style to this amazing company.
I'd like to thank you for stopping by & as always...Till Next Time!

Sunday, July 14, 2013

Altered Tin...Sneak Peek!

Today I'm sharing a bit of a sneak peek...This is an up-cycled Christmas cookie tin that I've decided to alter into a trinket box. After sanding the tin I started by painting it with the black Apple Barrel acrylic paint using a coarse brush in a pouncing motion. This helps the paint to stick & not bead up. I added the hot glue dots for rivets & a bit of faux welding detail on the top, although it will probably be hidden by the planned decoration for the top, then gave it another coat of the black paint. I then heat set the paint with my heatgun. After it was completely dry I began adding layers of Lindy's Stamp Gang sprays...I began with Starburst spray in Cocoa Bean Copper then heat set, I followed this same technique of spraying then heating with the remaining colors...Moonshadow Mist in Gossamer Gold, Starburst spray in Mission Bell Brown & then finally Starburst spray in Golden Lump of Coal to add some good shadows. I finished it all off with a coat of satin sealer.
I love the way this piece is turning out so far. The Lindy's Stamp Gang Sprays are fantastic for this type project & I've started to use them on some polymer clay pieces with great results so stay tuned for more on that.
Hope everyone is having a great weekend! We are getting some glorious rain...we need it so much! Thanks for stopping by, I'll finish this piece up & be back for an up-date tomorrow. Till Next Time!

Thursday, July 11, 2013

"It's a Bird, It's a Plane...No It's a mini"

Well...a not so Mini...lol! Back to a little paper crafting. I used a Maya Road Dress Form Mini & the Prima Welcome to Paris collection to create this "Retro Fashions" mini album. As you may know I love themed projects so I tried to keep a seamstress/ dress makers shop in mind while working on this mini album. It might possibly hold some wallet sized photos & there's plenty of room for journaling inside but the pages are quite "mini". My goal here was to use up what were for me some challenging products. The 6x6 paper pad was the first challenge since I usually work in a much larger scale, second was the dress form pages themselves. I've also uploaded a YT video if you'd like to see the complete project.
"Retro Fashions" mini album cover
 The patterned paper on the cover is from the ColorBok Vintage Treasures collection & the zipper pull is a Prima embellishment. The flowers are all my own handmade fabric & paper flowers & the buttons are from my stash.
"Retro Fashions" mini album

"Retro Fashions" mini album spine
 The spine is embossed using the Cuttlebug DeVine Swirls folder & the paper rosette is made of paper from the ColorBok collection also...& so is the inside cover paper.
"Retro Fashions" mini album inside

http://www.youtube.com/watch?v=jRPrrgtihYQ&list=UUcCXHSCqnDifufXItxRimSw&feature=player_detailpage

The dress forms are all dress in the Welcome to Paris collection by Prima & I've fussy cut elements from the collection to use as embellishment throughout. Black paint & embossing powder gives the tops & the dress form stand the look of painted metal. I've also used some trims & bling from my stash to complete the mini & bring it all together with an accordion binding.
That's it for this evening. Thanks so much for stopping by...Till Next Time!

Monday, July 8, 2013

"For the Love of Nature"

I'm often inspired by nature when working with clay & with other materials as well so today I thought I would share a few Nature inspired pieces. Natural colors & shapes, textures & images are all capture here in polymer clay...
   This first piece is a faux GoldStone & is set in a gold clay bezel that has been rubbed with some copper pearl-ex powder . The stone is glazed with liquid Sculpey & it was the first time I had tried it. It was a bit messy but gave some great results.
"Falling Copper Leaves"
 This piece a collage piece created using a mold I made from an old cigar snuffer. The base is a tree stump in brown clay with some gold clay leaves & the whole piece is rubbed with some antique gold pearl-ex powder. The face is a mix of green clays & the acorn dangle is gold clay also. The entire piece was then glazed with a satin sealer after being antiqued with some black acrylic paint.
"Ode to the Green Man"
 This piece features a faux sandstone center stone & accessory beads in a faux cactus skeleton bezel. I actually molded the bezel from a piece of cactus skeleton & then antiqued it in a burnt umber after baking. The small light colored accessory beads show the color of the clay mix I used in the bezel before antiquing.
"Desert Sands"
 This piece is a green "PearlStone" created with layers of transparent & pearl clays in green. A clay tree branch bezel with leaf bail & matching dangling leaves down each side, hugs the centerstone & a burnt umber antiquing finishes it off very nicely.
"Forest Amulet"
Whew...that's it for now. I'm off to rest my poor toe...kicked the bloomin' chair & broke one of my little toes. Grrr...& on the same foot that just got off the injured list. I guess it felt left out when the leg & the foot were broke...lol! Well Thanks for stopping by...Till Next Time!

Friday, July 5, 2013

"Layers of Blue"

"Layers of Blue" I only have three pieces to share today all layered faux stones in blue polymer clay. Pearl, transparent & some blue & black clays with some pearl-ex powders & glitters in different variations make up these three faux stones.
The first piece is a lovely delicate setting of gold clay rubbed with an antique gold pearl-ex powder. The faux stone is a layered "pearl Stone" Transparent blue & pearl layers, the second picture show the pearl layers a bit better. The entire piece is finished in black antiquing & a gloss glaze.
"Golden Elegance" 
"Golden Elegance" Different angle
 This next piece I titled "The Quiet Ocean" for the early morning soft sounds of the ocean when your on the beach. The faux Paua shell was another of my first attempts. I used layers of different pearl blues & black, I think a bit of purple is in order for next time. A silver clay bezel & a few faux pearls. Again antiqued in black & finished with a gloss glaze.
The Quiet Ocean"

 The final piece for today & I used an older photo because it shows off the colors, pearl & glitter effects better. A gold bezel this time with some royal blue acrylic stripes. The faux stone is layers of different pearls & transparent clays in blue with silver & gold glitters. The entire piece is antiqued in black & finished with a gloss glaze.
"Sands Of Egypt"
Well enough for today...I think...lol. I hope everyone is enjoying the holiday. Thanks for stopping by... Till Next Time"!

Thursday, July 4, 2013

"Clay Bezels & Glass Pebbles"

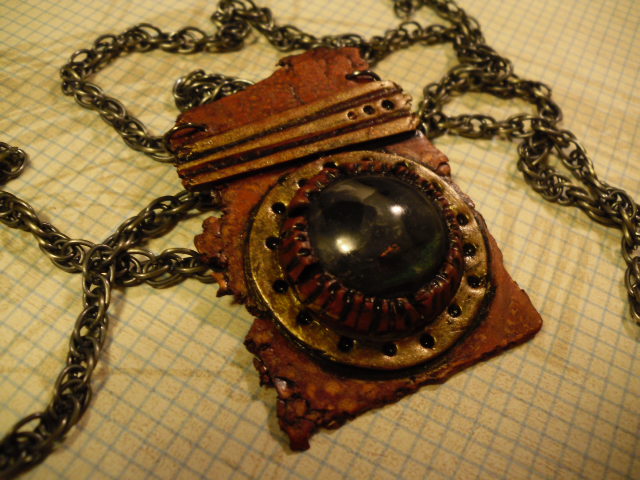
"Clay Bezels & Glass Pebbles" I just love to make these. Lots of inclusions can be used under these glass pebbles...glitter, fantasy film, images(paper or drawn/transferred onto clay) & gold leaf just to name a few. So here's a few that I made a while back...
"Imperial Panda Talisman"
 This first piece has a faux Jade bezel with a faux ivory background & surrounding the glass pebble. The background has a pencil drawing transfer onto raw clay before the pebble is added & the bezel built up. This piece was antiqued in a whitewash after baking & set with a satin sealer.
"Imperial panda Talisman" different angle
This next one was my attempt at some tiny peacock feathers...Ok maybe I should try again...lol. This time I used a blue glass pebble with blue leaf glitter underneath & a gold clay bezel & feathers. The clay was rubbed with Interference violet Pearl-Ex powder before baking & also glazed with it after. This time the name tag has a feather design on the back side as well. The piece is strung on a leather cord with a gold tone toggle clasp.
"The Peacock Talisman"
 This one is so gorgeous in the sunlight! The blue stone has blue Martha Stewart leaf Glitter underneath & a silver bezel antiqued in black. The loop in the bezel is reinforced with a hidden wire bail. This piece is also strung on a leather cord with a silver toggle clasp this time to compliment the piece.
"The Mirror to the Soul"
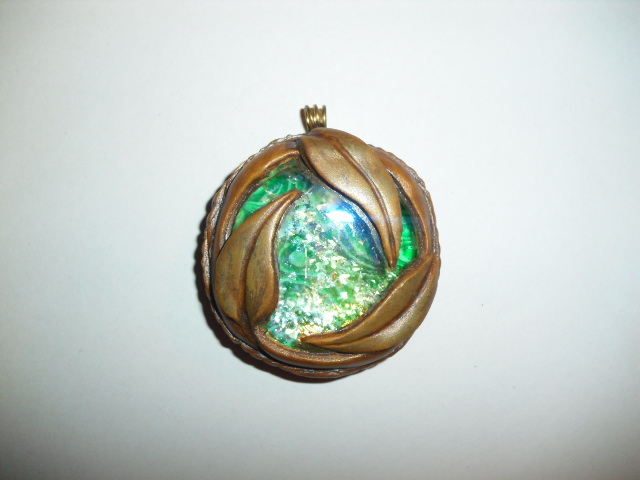
 This was one of my first pieces using the glass pebbles & I still love the way it turned out. Varigated gold leaf is underneath the glass pebble this time & also on the flames around the bezel. The bezel itself is gold clay & the entire piece is antiqued in black. The accessory beads are black clay with some of the gold leafing. All these pieces were sealed with a gloss sealer.
"Fire & Lava"
 Another piece the really catches the light is this one with faux Malachite under the glass pebble. The Malachite was topped with some glitters before the glass pebble was set & the gold clay bezel was formed. This was then rubbed with some green pearl-ex, to give it a patina look. Then the piece was antiqued with a burnt umber & sealed with a satin sealer.
"Copper Leaves"
 This is one that I did a YT tutorial on last Christmas. Silver clay surrounds an image of Santa under a glass pebble. Then I made a few clay charms to dangle off the bottom of the piece.
"It's Christmas Time Again"

 Last(well just for today) but not least is this gorgeous piece. The same blue glass pebble with blue leaf glitter underneath, this time with a silver bezel that has some antique silver pearl-ex mixed in & rubbed onto the top. Then after baking the whole piece is antiqued in black & sealed with a satin sealer.
"Star Gazing"
Wew! That was quite a few for the 4th & I just squeaked it in...Now that my poor "little doggie" (his nickname, he's not so little...lol) is finally starting to calm down after the fire works, maybe I can call it a day. Hope everyone had an amazing 4th & thanks so much for stopping by...Till Next Time!

Wednesday, July 3, 2013

"Stingers & Rattles"

"Stingers & Scales"...Ok since we're right in the middle of summer & here in Texas the really hot part, I thought I'd share a few hot weather critters. All in polymer clay of course...no critters were harmed during this blog post...lol. First up lets go with the "Texas Rattler", a copper, black & transparent "glitter stone" with copper & gold micro fine glitter surrounded with a black clay snake bezel that's been rubbed with gold acrylic paint & sealed with a satin sealer...
"Texas Rattler"

"Texas Rattler" different angle

 This one is "The Black Snake" & was created the same way as the "Texas Rattler". Black polymer clay bezel this time rubbed with pearl pearl-ex powder & then sealed with a satin sealer & antiqued in a red acrylic paint. The "stone" is another of my "glitter stones" of transparent, red pearl & red transparent clays with silver & red micro fine glitters it is then sealed with a gloss sealer after the buffing & polishing.

"The Black Snake"

"The Black Snake" different angle
 Next up is my own personal nightmare...lol. I've always been terrified of these little beauties so I decided to try to conquer some of that fear by trapping on in polymer clay...well, a clay one anyway. This one is on a layered background of gold & lt. brown clay with a bit of transparent thrown in. The scorpion itself is gold clay with some black antiquing. Then the whole piece is topped with Magic Glos UV Resin.
"Scorpion in Amber" faux scorpion
 This one is using the same scorpion...yep, I made a mold of the first one I made so I wouldn't have to create another one. This one has a gold clay bezel with a back layer of liquid polymer clay then the scorpion in copper this time, was added & encased in the Magic Glos UV Resin with a bit of copper glitter added in.
"Scorpion in Resin" faux scorpion
Well that's it again for today. I hope everyone has a fantastic 4th...& watch out for critters! Thanks for stopping by...Till Next Time!