Showing posts with label molding putty. Show all posts

Monday, November 27, 2017

A Fun Fall Rhinestone Lizard Pin/Brooch

Hi everyone, Lyn here again with a fun Lizard Fall brooch/pin project for you. I originally created this pin years ago(back when Southwest design was all the rage...so the 80s...lol) and last time I wore it the back leg broke. Now it's only made of Shrink Plastic so it's not very thick, it's kinda curved, very textured & I needed to make a mold from it. So out comes the Amazing Mold Putty, it's perfect for getting the detail & I can add some depth to the pin at the same time.

After mixing up the 2part Amazing Mold Putty I pressed it out on my glass desktop to a pretty thin layer(1/4"or so) then I "rocked" the pin back a forth so that the whole pin made contact with the putty. I did it this way because I wanted the mold to be level and flat. Then let it cure(it only takes 10-20minutes)

Now for the resin! Here I used Amazing Casting Resin with a drop of Alumilite Dye in Brown so the final colors would really pop. I always have molds on stand-by to fill with "left-over" resin when I mix more than needed. Then left it set to cure(again 10-20minutes depending on the weather).


It worked! The finished Amazing Casting Resin Lizard is still thin but thick enough to be rigid. So it shouldn't snap like the original did.


I glued a pin back to the back with a bit of E-600 and  let that cure at least 30minutes but I let it set an hour just to be sure.

 Now comes the Fun part...using some Metallic Acrylic Paints I "dry-brushed" the pieces starting with Gold, then Bronze & then Copper. It dries really quick so just a few minutes and your ready for the next step...Rhinestones! Yep, Rhinestones...I had some of them in several sizes & colors! So I chose some Clear Aurora Boreallis & they reflect the colors perfectly. A bit of Black Acrylic Paint for the eyes & it's done!


This would make a great gift for the Holidays! So glad I didn't throw that little pin away when it broke...lol.

                What broken object could you mold and casting in Amazing Casting Resin?

Well that's it for this post...Till Next Time!!!

As always you can find my work on my blog LynzCraftz , on YouTube LynzCraftz , as well as FaceBook LynzCraftz .

Thursday, October 26, 2017

Witch's Cupboard ATC and Charm Swap Skull Charm

Happy Halloween everyone, Lyn here again for Amazing Casting Products bringing you a fun Halloween charm just in time for your big event!

After crafting the original skull from Super Sculpey and baking it until cured(according to package directions) I then glued it down to the bottom of a disposable plastic cup with my hot glue gun. Then I mixed the Amazing Mold Rubber(also according to package directions & slowly  poured it into the cup covering up the skull by about 1/2'' and let that cure overnight.

Now after de-molding it was ready to fill with some Amazing Casting Resin. After mixing pour it in the mold and let it cure for 10-20minutes before de-molding.

While the molded piece was still "soft" I screwed in a screw eye to make a charm out of the skull. Then using some Black acrylic paint I painted the whole skull and quickly(while it was still wet) wiped it back off. Leaving it with an antiqued finish.

I think it looks kinda creepy sitting on my handmade ATC card(Artist Trading Card) and my Art Journal.
                                  What will you create to go with your Halloween costume?

Well that's all for now...Till Next Time!

As always you can find my work on my blog LynzCraftz , on YouTube LynzCraftz , as well as FaceBook LynzCraftz .


Monday, October 16, 2017

SPOOKtacular Jewels skull ring


Hi Lyn from LynzCraftz here today hopping for Amazing Casting products and Designer Crafts Connection SPOOKtecular Jewels blog hop.
I first started with some Super Sculpey Polymer Clay and formed the "jewel" crystal shapes, baked them and when they cooled molded them using Amazing Mold Putty.

 
The using Amazing Clear Cast and some glitter flakes I poured the "Jewels" & let them cure over night.


Once they were cured I made the ring base and some little skulls out of more Super Sculpey but before baking I added one of the crystals(don't worry Amazing Clear Cast is heat tolerant at polymer clay temps of 275F). Then I baked the piece. I painted the ring with acrylic paints taking care not to get paint on the crystal.


 Here I'm showing the crystal with light shining from behind...pretty huh?


A shot of one of the little skulls after I added the antiquing with acrylic paint.


A true SPOOKtacular Jewel for you Halloween costume! Happy Halloween from Amazing Casting Products and Designer Crafts Connection!

                                      What's your Halloween costume going to be this year?

Thanks for joining us for the fun blog hop with Amazing Casting Products and Designer Crafts Connection!!!

As always you can find my work on my blog LynzCraftz , on YouTube LynzCraftz , as well as FaceBook LynzCraftz .

Friday, July 14, 2017

Voyage Beneath the Waves! Trinket Box by LynzCraftz

Hi everyone, it's Lyn here again from LynzCraftz...join me this week beneath the waves with this super fun project. Voyage Beneath the Waves trinket box started out as an old aquarium embellishment that had ceased to function.


 I molded it with Amazing Mold Putty & then poured it with Amazing Casting Resin & let that cure. After de-molding it I then painted it with Acrylic Paints.

It turned out nice I think! Anyway...I then took a small wooden hinged box(from the craft store) which I had painted blue & added some stenciling with texture paste in the form of bubbles.
The box then got a few layers of acrylic paint in some underwater colors, Super Sculpey Seaweed, some pearls & rhinestones & sand mixed with Matte Medium finished off the box.


What an underwater scene! Makes a great little jewelry box or gift box for something special! Amazing Mold Putty is so easy to use, mold almost anything you can think of! Then use some Amazing casting resin to make something fun to use in your next project!

                                                          What will you mold next?

Well that's it for this week...Till Next Time!  And as usual you can find my work on my blog LynzCraftz , on YouTube LynzCraftz , as well as FaceBook LynzCraftz .

Wednesday, July 5, 2017

"Sunning on the Beach" Polymer Clay Pendant

Hi all, Lyn here again with a rather chatty tutorial on this sweet little Summer pendant. I did a video tutorial sharing creating this pendant.

Just a quick post today but many more to come so stay tuned! Till Next Time!

As always you can find my work on my blog LynzCraftz , on YouTube LynzCraftz , as well as FaceBook LynzCraftz .

Monday, May 8, 2017

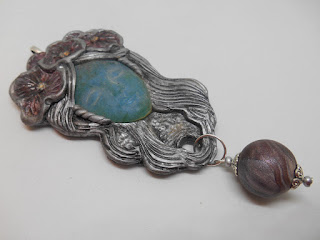
DIY using Swellegant on Polymer Clay

Ok, admittedly the before picture already has a base coat of swellegant Silver Metal Coatings on it but you should still get the general idea...it started out as Sliver Premo clay.

I then added the Darkening Patina to the piece & some of the Blood Red Dye Oxide to the Poppies.

After the Swellegant has time to bloom & Dry it takes on a whole new appearance! Basically "Instant Vintage"! She's so lovely! I added a bead made by a dear friend of mine & presto...finished!
Swellegant is amazing!

Well that's all for today...Till Next Time!

As always you can find my work on my blog LynzCraftz , on YouTube LynzCraftz , as well as FaceBook LynzCraftz .


Wednesday, April 19, 2017

Blog Hop for Amazing Casting Products & Stencil Girl Products


Hi everyone Lyn Gill here from LynzCraftz. Welcome to the Blog Hop! I have a project to share with you today using AmazingCastingProducts in collaboration with StencilGirlProducts
I first started with the sculpture, Sculpted with Super Sculpey Polymer Clay & then baked. I then coated her with a gloss sealer to create a better finish on the final mold.
Then I formed the mold using Amazing Mold Putty. I first covered one side of the sculpture & then carefully added more Amazing Mold Putty to the other side. I knew I would need to cut the mold at least part way up to get the piece back out but since I'd planned it I knew it would be fine.
 So here's the finished piece...I used Amazing Clear Cast Resin & you can see she's beautifully clear.
She rests on a pedestal made of corrugated cardboard ...unpainted. I'll explain where I was going with this idea in a minute. The base was made my husband & is just 2 pieces of plywood, rabbited together then primed with gesso.
 Some texture paste through a brick stencil & some brick red acrylic paint starts off the background.

 Stencils by StencilGirlPoducts
 The comes the magic! Using stencils by StencilGirlPoducts I created a graffiti background...gorgeous!
Stencils used:
 Text and Texture Explore Stencil
 Timeless Stencil
 Past Present Future Stencil
 Inside Out Stencil
 Website: www.stencilgirlproducts.com Blog: www.stencilgirltalk.com

 I added a cardboard semi-circle & painted it & did some faux rusting drips as well. Then I added 2 more cardboard pillar to the scene & the roof. I love how the cardboard & graffiti show the fleeting nature of today's art as opposed to the timelessness of Ancient art specifically marble statues, which is what the idea behind what this piece portrays.
 So here she is "Venus of the Modern World" in daylight...
 OH Wait...I forgot to mention...I added light to the pedestal so it would shine up through the resin! Clever right?

 A few close-ups showing her lit-up...

I truly enjoyed this project with AmazingCastingProducts as well as working with the awesome stencils by StencilGirlProducts.
Oh & did I mention the giveaway!
GIVEAWAY One lucky winner will receive both a $25 Gift Certificate to StencilGirl Products AND a $25 Gift Certificate to Amazing Casting Products! Visit the fabulous designers from both teams and comment for your chance to win! The more blogs you comment on, the more chances you have to WIN! (One comment per blog please.) You have until Sunday, April 23rd at 11:59PM Central Time to leave your comments. Winner will be announced on StencilGirl's Facebook [ https://www.facebook.com/StencilGir... ] page and Amazing Casting Products’s Facebook [ https://www.facebook.com/AmazingMoldPutty/ ] page on Monday, April 24th.
So hop along we me & my fellow Amazing Casting Products design team members...

April 19th
Thanks for stopping by...Till Next Time!

As always you can find my work on my blog LynzCraftz , on YouTube LynzCraftz , as well as FaceBook LynzCraftz .