Yet another practice piece "Waves on the Sand" started out on a piece of foam core board. I created some texture with some modeling paste, some random glue gun drips(from my glue gun holder...lol) & 3 small resin rocks that I created from a mold I made from a piece of Pyrite. I then painted the background color with some acrylic paint...
OK liking the look so far...I then mixed up so Amazing Clear Cast Resin & separated it into different cups. To one I added Ocean Blue Alumilite Dye & a bit of Pearlescent mica powder, to another I added some gold mica powder, to another I added some white acrylic paint(just a bit, no more than 5% by volume or it will retard the hardening of the resin) & some pearl mica powder, then to the last cup I added only white pearl mica powder...I stirred each cup...then I poured the Ocean Blue Resin & half of the white pearl resin into the same cup(but didn't stir them together)& slowly poured it onto the top left portion of the "canvas" allowing it to settle & pushing the rest with my stir stick so that it covered the edges, I also made sure that it went into the textured areas somewhat. Then I repeated this process with the gold resin & poured the other half of the pearl resin into the cup with the gold(still without stirring) & slowly poured it onto the bottom eight of the "canvas" again allowing it to settle & pushing it to the edges with my stir stick.
I then took the white resin(the one with the acrylic paint & pearl mica powder)& slowly drizzled it from my stir stick in a back & forth motion to simulate waves. I did this on both halves of the "canvas". Then let it cure for a couple of hours before repeating the process with the white resin & more Amazing Clear Cast resin.
The difference is especially noticeable amongst the rocks. I let the entire piece cure overnight.
Such a fulfilling experiment! I love how the textured area turned out although it's a little difficult to see in the pictures. Still...so much Fun, like a Day at the Beach...lol.
Well thanks again for joining me today...Till Next Time!
Creating Art and Jewelry in an Old World Style using Polymer Clay, Resin and Found Items by Lyn Gill
Thursday, January 26, 2017
Tuesday, January 17, 2017
Grey Winter Skies!
A close up of "Grey Winter Skies" but you can't see the depths of the piece so close in so lets back up...
Sparkly & Shimmery Silver, Pearl & White with the look of thin wispy clouds. Just another fun resin practice pour. Hopefully working toward my counter tops someday soon?
Friday, December 30, 2016
New Years Party Wall Art
HAPPY
NEW YEAR!!! Hi everyone, Lyn Gill here again for this months
inspirational post. This time it's my first try with resin
painting/pouring & I love it! It's just a piece of Foam Board but
it's the perfect thing to practice on.
Using just 16 drams of Amazing Clear Cast resin (8 drams of pt A & 8 of pt B) in the measuring cup, after mixing I divided it into into 5 different cups & colored each one separately with a little Alumilite Dye & Alumidust in different colors then poured them each(except the white pearl) back into the larger mixing cup without re-stirring. Then I pour the whole mixing cup onto the foam board at one time & allowed it to settle, tilting the board when needed to get the resin to cover the board. Then I dropped little drops of the white pearl resin(Amazing Clear Cast & Pearl Alumidust) in various areas of the board & let it cure over night. If you try this be sure to cover your work surface with waxed paper or some other protection as this can be a messy project.
The results are stunning! I'm crazy about this technique & will definitely try more!
Gorgeous right? It was so much fun & I love the randomness of the finished piece...no two will ever be the same! Much more in the New Year I promise!
Do you have any crafty New Years resolutions?
Well than you so much for joining me again this month at Amazing Casting Products & Have an Amazing New Year!...Till Next Time!
As usual you can find my work on my blog LynzCraftz , on YouTube LynzCraftz , as well as FaceBook
Using just 16 drams of Amazing Clear Cast resin (8 drams of pt A & 8 of pt B) in the measuring cup, after mixing I divided it into into 5 different cups & colored each one separately with a little Alumilite Dye & Alumidust in different colors then poured them each(except the white pearl) back into the larger mixing cup without re-stirring. Then I pour the whole mixing cup onto the foam board at one time & allowed it to settle, tilting the board when needed to get the resin to cover the board. Then I dropped little drops of the white pearl resin(Amazing Clear Cast & Pearl Alumidust) in various areas of the board & let it cure over night. If you try this be sure to cover your work surface with waxed paper or some other protection as this can be a messy project.
The results are stunning! I'm crazy about this technique & will definitely try more!
Gorgeous right? It was so much fun & I love the randomness of the finished piece...no two will ever be the same! Much more in the New Year I promise!
Do you have any crafty New Years resolutions?
Well than you so much for joining me again this month at Amazing Casting Products & Have an Amazing New Year!...Till Next Time!
As usual you can find my work on my blog LynzCraftz , on YouTube LynzCraftz , as well as FaceBook
Wednesday, December 14, 2016
The Christmas Cabin
Hello
everyone Lyn Gill here again this time with a fun Christmas
project...The Christmas Cabin! It's a little Electric Tea Light Holder I
created for the Holidays...
I created the main pieces from Super Sculpey, just simple shapes kind of like a paper doll house.
Then I molded them using Amazing Mold Putty...at this point I was super excited about the outcome!
I then mixed some Amazing Casting Resin with some Alumilite Dye in Native American Fleshtone since I wanted a more redish brown color & let it cure in the molds. After de-molding I brushed on a little more of the dye to give it the true look of wood. I then lined the back of the window with painters tape & poured a little bit of Amazing Clear Cast tinted with yellow Alumilite Dye & let it set up overnight. For the roof pieces I left the white color of the Amazing Casting Resin.
I added some of the details(tree, shrub, wreath, door & window shutters) using the Super Sculpey, Snow Texture & acrylic paints and created the base from Super Sculpey as well.
So fun & festive! It truly shines a little light on the Holidays!
What Christmas Decor will you create using Amazing Casting Products this year?
Well thank you so much for stopping by the share these Holiday memories with me & have a Merry Christmas one & all...Till Next Time!
As usual you can find my work on my blog LynzCraftz , on YouTube LynzCraftz , as well as FaceBook LynzCraftz .
I created the main pieces from Super Sculpey, just simple shapes kind of like a paper doll house.
Then I molded them using Amazing Mold Putty...at this point I was super excited about the outcome!
I then mixed some Amazing Casting Resin with some Alumilite Dye in Native American Fleshtone since I wanted a more redish brown color & let it cure in the molds. After de-molding I brushed on a little more of the dye to give it the true look of wood. I then lined the back of the window with painters tape & poured a little bit of Amazing Clear Cast tinted with yellow Alumilite Dye & let it set up overnight. For the roof pieces I left the white color of the Amazing Casting Resin.
I added some of the details(tree, shrub, wreath, door & window shutters) using the Super Sculpey, Snow Texture & acrylic paints and created the base from Super Sculpey as well.
So fun & festive! It truly shines a little light on the Holidays!
What Christmas Decor will you create using Amazing Casting Products this year?
Well thank you so much for stopping by the share these Holiday memories with me & have a Merry Christmas one & all...Till Next Time!
As usual you can find my work on my blog LynzCraftz , on YouTube LynzCraftz , as well as FaceBook LynzCraftz .
Thursday, December 8, 2016
My Family Tradition "Christmas Pins"
Hi everyone it's Lyn Gill here again. This time with my Christmas pins for this year. As I did a post on this last year I though I would continue with the tradition my Grandfather started many years ago...Christmas Pins! Now my Grandfather was a wood carver & made beautiful pin so I thought I would continue the tradition.
First I started with my original sculpt of the Christmas Tree out of Super Sculpey Polymer Clay then a created a mold from Amazing Mold Putty. I was just a simple sculpt but that's part of the tradition.
Then I began to add various glitters, Alumilite dust, Alumilite Dyes & a touch of glitter glue to the ornaments for the final results...
I always enjoy creating these little gifts for family & friends at this joyous time of year & I hope you'll give it a try. Create a new tradition this year with little handmade gifts.
Thank you so much for joining me today to share one of my families traditions & have a very Merry Christmas!
What new family traditions will you add to the holidays this year?
As usual you can find my work on my blog LynzCraftz , on YouTube LynzCraftz , as well as FaceBook LynzCraftz .
Friday, November 18, 2016
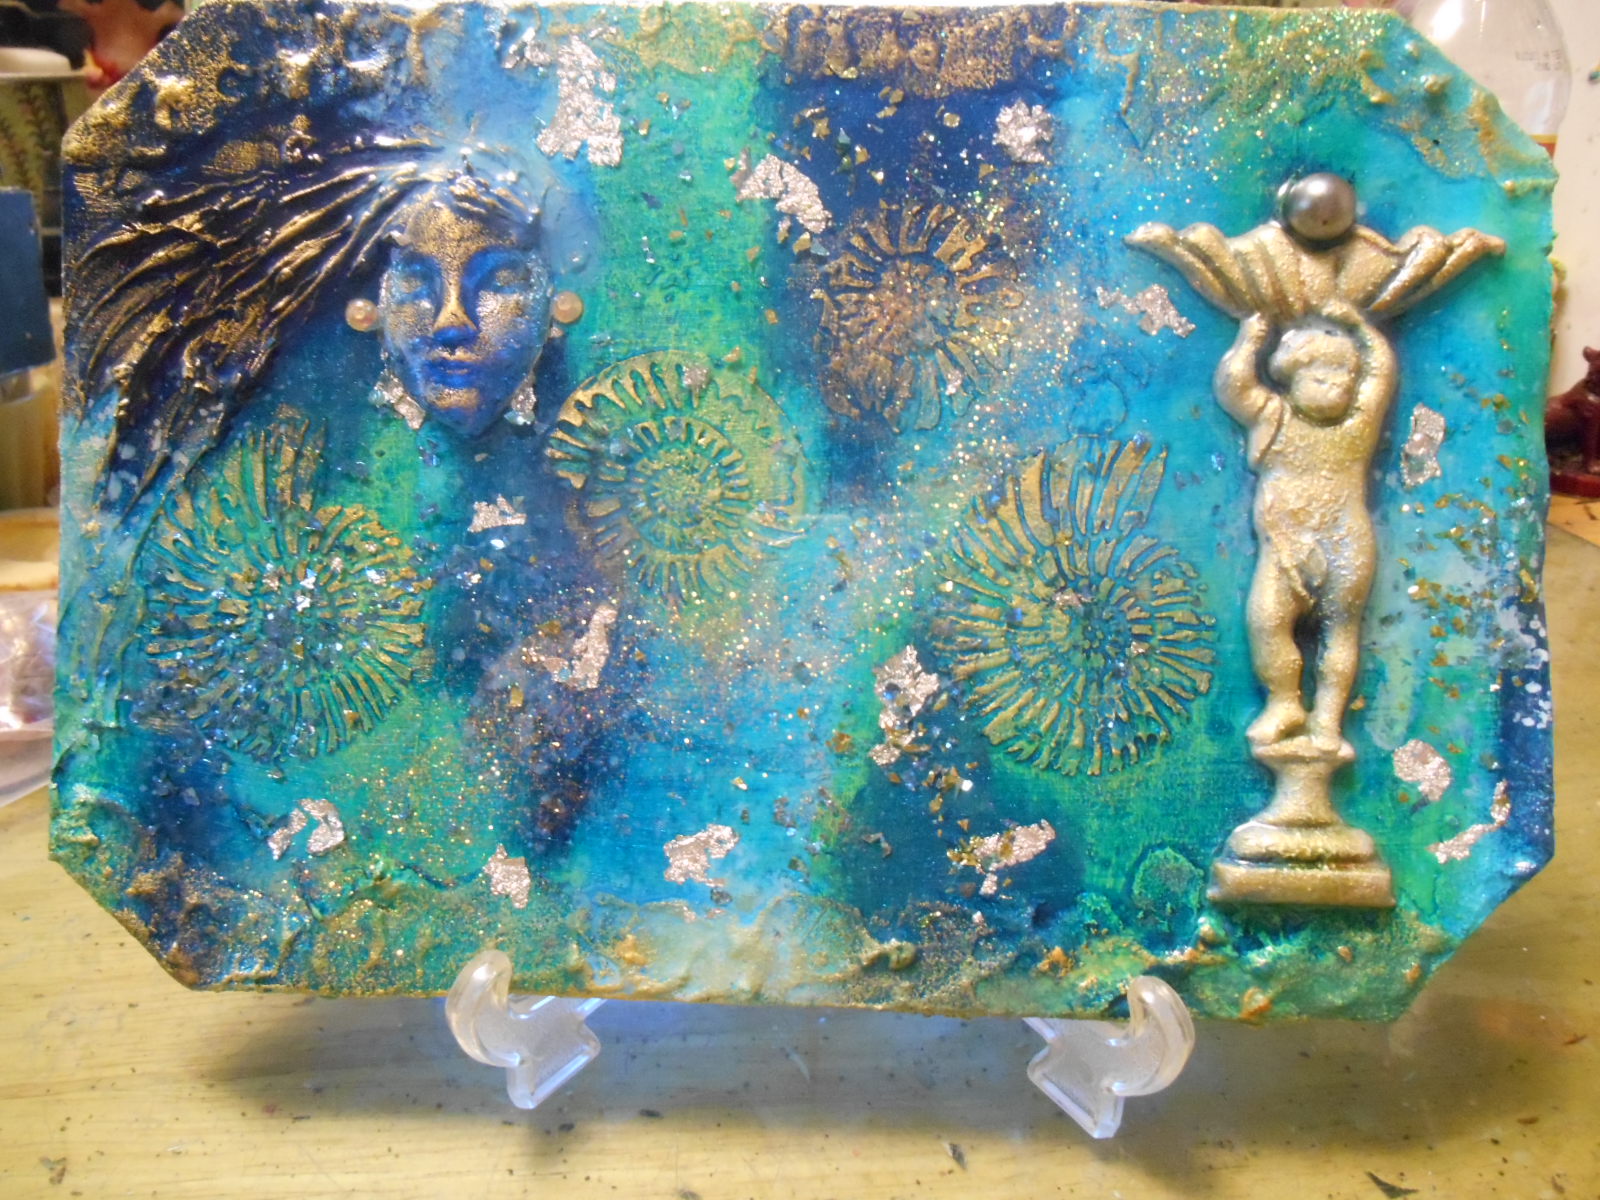
"Relics from Ancient Times"
Hi everyone, Lyn Gill here again & today I have a real treat for you with this fun wall plaque I created using the Prima "Iron Orchid Designs" molds. These mold are perfect for using with resin in your designs.
First I used Amazing Casting Resin and a bit of Alumilite Metallic Powder in Gold in these IOD molds for the Cherub.
I placed him on a plaque I made with a bit of "Foam Core Board" that you can get even at the dollar type stores. I then added some details with Moldeling Paste through a stencil & once that dried I painted the "plaque" with acrylic paints & sprays. To this I then placed my Amazing Clear Cast molded face to the "plaque" & added more Modeling Paste for the hair & let dry once again.
I then added some glitters & some Silver Leaf to the background before covering the whole piece with Amazing Clear Cast Resin for the perfect finish!
I'm really enjoying these IOD Molds & I think you will too, they can be used in many ways with many products. With Amazing Casting Resin & Amazing Clear Cast you can't go wrong they really are the perfect pairing!
Thank you all for stopping by today I've enjoyed sharing my process on this fun Wall Plaque with you...Till Next Time!
What will you create with these fun molds? As usual you can find my work on my blog LynzCraftz , on YouTube LynzCraftz , as well as FaceBook LynzCraftz .
Monday, October 31, 2016
DOTD Post
Hi everyone Lyn Gill here...Wanting to welcome you to "Day of the Dead" week here on the blog.
I have created a little inspiration for you...a pendant! Surprised? Well, what can I say it's what I do...lol.
| Amazing Mold Putty |
| Amazing Casting Resin & AlumiliteMetallic Powder |
| Death Becomes Her |
Well I'll say farewell for now...Till Next Time! As always you can find my work on my blog LynzCraftz , YT LynzCraftz , or on Facebook LynzCraftz .
Subscribe to:
Posts (Atom)